Monday, December 16, 2013

Challenge Winners - Gift Tags and Note Cards

STOP PRESS: We are pleased to announce The Funkie Junkie Boutique now stocks a range of items from Prima, perfect for adding that touch of magic to your projects whether they be Frilly or Funkie. All competitively priced, you can find them HERE.

Welcome to the Frilly and Funkie challenge blog for the last time this year. The day has arrived to announce the winners of the 'Gift Tags and Note Cards' challenge. We would like to thank those who took the time to enter. Though there were only a few entries this time they were all beautiful and the Design Team voted for this wonderful entry by #1 Heather A Hudson.


We loved the vintage feel and glittery touches to this festive tag. Congratulations Heather on being our favourite for the 'Gift Tags and Note Cards' challenge and winning the opportunity to be a Guest Designer here at Frilly and Funkie for a future challenge.

And Random.org has chosen a winner for our $25 gift certificate to The Funkie Junkie Boutique. Our congratulations go to #3 Marilyn S.


A huge thanks from the Frilly and Funkie team to everyone who took part in this challenge and congratulations again to our winners. Please email Linda at thefunkiejunkie@gmail.com for the codes for the winner's badge and to give us your email address for the Guest Designer details (Heather) and for the gift certificate details (Marilyn).

We will be back on January 1st 2014 with a brand new challenge and look forward to seeing you all then. In the meantime we wish you all a very Happy Christmas and a creative New Year xxx

Wednesday, December 11, 2013

Seasons Greetings

Welcome back to the Frilly and Funkie challenge blog. For those expecting to see the beginning of a new challenge the Design Team are now taking a short break over the festive period. We'll be back on Wednesday, January 1st 2014 for the start of a new challenge. The winners from the last challenge, 'Gift tags and note cards' will be announced as usual next Monday, December 16th so please check back then to see who the team have picked to join them for a Guest Designer spot next year. The Funkie Junkie Boutique will remain open for business as usual (check Linda's blog for details of any temporary closures).

For those in need of their challenge 'fix' fear not. Linda, The Funkie Junkie, is continuing the '12 Tags of Christmas challenge' over at her blog and has extended the challenge through January 8th (see details HERE). As well as three randomly drawn gift certificates being up for grabs, for those completing the tags there are discount coupons to The Funkie Junkie Boutique too as long as you meet all the requirements for each and every post.

The whole team would like to take this opportunity to thank you for your company during 2013. Your positive reactions and amazing challenge entries mean the world to us. We wish you all a very Merry Christmas and hope that for all of you the New Year is a prosperous and creative one.

Friday, December 6, 2013

Friday Focus - Dylusions ink sprays

Hello and welcome to today's Friday Focus ! It's Sue here and today I'm focusing on Dylusions ink sprays and getting thoroughly messy ! What's not to like ?


Dylusions ink spray dyes come in the most vibrant colours and with the latest addition of the White Linen spray, they really are so very versatile.


I decided to do a journal page and show you the different ways you can use these beautiful sprays. I have found that a thicker quality card works well but not too porous as this sucks in the ink, and the colour, which means the vibrancy of the colour is lost. I started by spritzing different colours on to the card to give me a base to work on.


I then used the Wendy Vecchi Polka Dotty stencil and sprayed through it. While the stencil was still wet with the ink, I flipped it over and pressed it on to another area of the card. This way you get both the positive and the negative print, which you can see on the below photo.


I did the same technique again this time using the Yikes Stripes stencil.


As these inks react with water a great technique is to take a paint brush and a stencil and bleach out some of the ink using just water. You can also spray water through a stencil and blot it off with kitchen paper for the same effect.


The inks will also work if you want to stencil using Cut 'n' Dry foam and by pouncing the foam onto the stencil you get a really clear image.


I've also used the Wendy Vecchi 3 Flourishes stencil and drawn around the image with a white pen to make it pop. You may also be able to make out a faint image using the Tim Holtz Shatter layering stencil. To finish the background I used the Tim Holtz Splatters layering stencil with black acrylic paint.


This is my finished page ready to go into my journal. The lettering, apart from the word 'door', has been painted with black acrylic paint and then highlighted with a white pen. The word 'door' is made from letters cut using the WordPlay die, painted black and highlighted with white. The door image has been mounted on Sized Arch die cut and again I've highlighted the edges with a white pen.

The inks also make beautiful backgrounds for cards, and below are a couple that I made after doing this journal page.


 The bleaching effect gives a really subtle, ghost type image and is great to stencil or stamp over.


Combining strong colours really makes them pop and you can bring the colour scheme through to the rest of your project.

I hope you've enjoyed today's Friday Focus as much as I've enjoyed doing it ! As you can tell by the colour of my hands in the photo's it's a really fun product to use !

Remember as a Friday Focus product all the sprays will have 15% discount for this next week so a great time to stock up !

As this is the last Friday Focus for 2013, I would like to wish you all a very Happy Christmas and best wishes for the New Year !

Sue
x

Thursday, December 5, 2013

Welcome to today's Guest Designer, Cindy !

Today we're welcoming Cindy Pointe, of The Creative Pointe, as our Guest Designer. Cindy was the winner chosen by the DT of the Thanksgiving challenge and therefore was asked if she would like to join us as Guest Designer for this challenge.

So, let's move on to what Cindy has to say and also share her fabulous project !


I've been a painter for over 25 years and had hesitated getting into papercrafting as I "already had enough hobbies",  but my sister became a Stampin' Up demonstrator and I received lots of product by helping her out hosting a party and then letting her pay off a washer with stamps! I basically just fiddled around making a few cards now and then.  Since I don't have kids I didn't think I "needed" to scrapbook. That all changed when my sisters, Mom and I created a scrapbook for my Dad's 70th birthday and I really enjoyed it. So...I made scrapbooks for my dogs!  And then for trips. Now I scrap everything that is meaningful to me. A few years ago I got a Cricut to make scrapping easier and then discovered Sure Cuts A Lot. What a revelation! I could make anything I wanted from paper! Now I design SVG files that I offer for free and sell online and host a challenge blog for SVG file users.  I paint, make cards, tags, multi-media pieces and even some jewelry....I love it all!
I have a marketing degree and have worked in the newspaper business for almost 30 years.  I live "up in Northern Michigan" in the woods on a little lake...heaven on earth...with my hubby and bulldog Gus.


 I love the faux chalkboard look that is so popular right now so I decided to create a Christmas gift tag that incorporated that element.  Of course I love to WEAR black and red so it was a "no brainer" to choose those colors for my tag.


I designed the tag so that the "To" and "From" section was on the back, allowing the tag to serve double duty as an ornament after the gift exchange.  For supplies used and step-by-step instructions on this Christmas gift tag, please click over to my blog:  The Creative Pointe.

I'm sure you will agree Cindy's tag is beautiful and will look fabulous on one lucky person's Christmas present ! There's still a few days left to join in with the current challenge which is Gift Tags and Note Cards.

All you need to do is join in to be in with a chance of being the next Guest Designer !

Wednesday, December 4, 2013

Gift Tags and Note Cards

Welcome back to week two of our latest challenge and thank you to those who have already shared their entries with us.  A quick reminder, we want to see vintage or shabby chic Gift Tags and Note Cards.  You can make one or the other or better still make both since they should be in high demand over the next few weeks with Christmas and all the related gift-giving and festive functions fast approaching.

So now it's time to share some amazing inspiration from the Funkie side of the DT.


Sue Carrington - Stamping Sue Style

Linda Coughlin - The Funkie Junkie


******************************************************************
WEEK ONE

Cec here and I am your hostess for the new two-week challenge starting today here at Frilly and Funkie.  This time we want to see vintage or shabby chic Gift Tags and Note Cards.  You can make one or the other or better still make both since they should be in high demand over the next few weeks with Christmas and all the related gift-giving and festive functions fast approaching.

To enter, create a new project, link it below and you could be chosen as our winner and the next Guest Designer here at Frilly and Funkie. There is also the chance to win a $25 shopping spree at The Funkie Junkie Boutique for one winner chosen at random!

Remember our new rule, you can now combine our challenge with up to 10 challenges in total (including this one) to qualify.

The Frilly side of the DT has created some wonderful inspiration to get you started!

Rebecca Deeprose - PaperPrimrose

Cec Wintonyk - CW Card Creations


We're a little shorthanded on the Frilly side this week and are so fortunate that Kathy Montgomery stepped in to guest design for our team.

Kathy Montgomery - In My Little Corner


Linda Coughlin - The Funkie Junkie
 Multi-purpose - can be used as gift tags or note cards.  


Monday, December 2, 2013

Challenge Winners - Christmas preparations

STOP PRESS; There is a one day  'Cyber Monday' sale on now at The Funkie Junkie Boutique. Running from 12.01am EST through 11.59pm EST, December 2nd, use the coupon code cybersale to get a 10% discount on your total order. Grab some bargains and do your festive shopping!!


Welcome to the Frilly and Funkie challenge blog for the start of a new week, and the day has arrived to announce the winners of the 'Christmas preparations' challenge. We would like to thank you all of those who took the time to enter. There were some extraordinarily creative and imaginative entries for the team to choose from this time. In the end the Design Team voted for this wonderful entry by #17 Paper Profusion (Nicola).


We loved the amazing attention to detail throughout this wonderful creation. Congratulations Nicola on being our favourite for the 'Christmas preparations' challenge and winning the opportunity to be a Guest Designer here at Frilly and Funkie for a future challenge.

And Random.org has chosen a winner for our $25 gift certificate to The Funkie Junkie Boutique. Our congratulations go to #14 Sonia Kertznus.


A huge thanks from the Frilly and Funkie team to everyone who took part in this challenge and congratulations again to our winners. Please email Linda at thefunkiejunkie@gmail.com for the codes for the winner's badge and to give us your email address for the Guest Designer details (Nicola) and for the gift certificate details (Sonia).

Our current challenge, 'Gift tags and note cards', runs through Tuesday, December 9th. We hope to see you entering this time around so that you too can be in with a chance to win. And remember, you can now enter up to 10 challenges including ours, and a maximum of 3 entries per person to our challenge. Please remember to link back to our challenge in your entry and mention in your post that you are entering this Frilly and Funkie challenge.

Have a great week!

Saturday, November 30, 2013

Saturday Step X Step - Tussie Mussie

Cec here and today is my turn for the Step X Step so I am going to show you how I made the Tussie Mussie for the Christmas Preparations challenge.

I started with a 10" square of paintable wallpaper. I picked this up at a local paint and wallpaper store and have a large roll for under $20. You can see just how deeply embossed it is. I suggest you try to find an all-over pattern such as this one rather than one that is in a grid. You can paint it but I chose to leave it white. You could also use a square of patterned card stock.


On the back side, add a strip of double-sided tape down one edge, making sure to butt it right up to the edge. Grab your square by the corner opposite your taped edge and roll into a cone, making sure you get a point and once you are happy with the shape, stick the taped edge to the cone. If your seam isn't perfect, don't worry because when you hang your Tussie Mussie the seam is going to be at the back.


Next I trimmed the cone so that the top was flat. If you are using double-sided patterned card stock, you might choose not to trim the top down as I did. I punched two holes on either side of the top and added a ribbon for a hanger, knotting each end on the inside.


The next step was to pull out a variety of venise laces and other trims and decorate the cone. I added lace to the inside of the top facing it upwards and then added some deep venise lace and a row of pearls to the top. Other laces and trims were added at intervals down the length of the Tussie Mussie as you can see in the finished product. Some laces face up and some down. Once the laces were in place, I tucked a bead dangle to hang from the bottom.


Next I took a Melissa Frances cherub and painted it gold with some craft paint. This was glued to the top on the side opposite the seam (the front). Then I began to make other elements to put inside the tussie mussie.


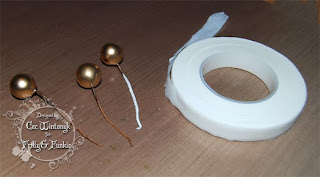
The gold berries came in a spray so I removed three of them and wrapped them in white floral tape and then I wrapped the three together.


I found some free sheet music online, sized it on the computer and printed it. Then I distressed it with my scissors and inked it with some Vintage Photo Distress Ink before I rolled it into a tube.


I cut a length of gold mes ribbon, pinched the bottom together and wrapped some metallic wire around it to make a fan shape.


The flower was made from layers of crinoline and tulle cut with the Tim Holtz Tattered Florals die. A pearl brad was added to the centre.


To finish the Tussie Mussie, I filled it with shredded curly paper and then glued in all the elements I made as well as some feathers and pearl sprays from my stash. I hope you will give one of these a try because they are quite easy to make and can me decorated and filled in numerous ways. This one is going to hang on my Christmas tree and fill one of the pesky bare spots because it is so long. You can make your Tussie Mussie whatever length you want.

The following products from The Funkie Junkie Boutique were used to create this project:

Friday, November 29, 2013

Friday Focus - Distress Glitters

STOP PRESS; on December 2nd there will be a one day 'Cyber Monday' sale at The Funkie Junkie Boutique! Running from 12.01am EST through 11.59pm EST that evening use the coupon code cybersale to get a 10% discount on your total order.

Hi everyone. Jenny here with our regular Friday Focus feature here at Frilly and Funkie. This week's featured product is relatively new to the market so it's really special that Linda has chosen to give everyone a 15% discount for this coming week (and that's on top of the current discounted prices!!) You can find them HERE.
I've become seriously addicted to Distress Glitters recently as they are incredibly opaque and don't leave my clothing, house. family, dog, etc. sparkling for days. I wouldn't mind but they're not so keen - LOL!
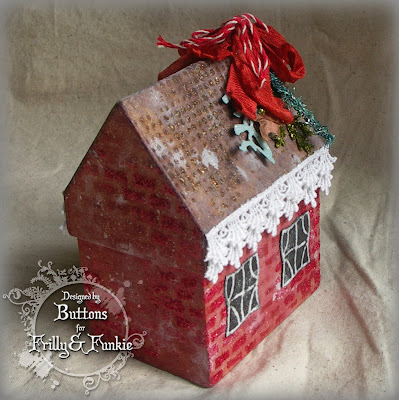
This little papermache box has a removable lid and was purchased really cheaply at a local discount store. Having sat, unloved, for a long time it has now been transformed into a special container for a present.
Here's a quick 'how to'. I started by applying cheap PVA glue with a sponge through two stencils (one for the house and one for its roof).
Once the glue had dried Distress Ink was blended over the top. Possibly due to the type of base, the ink seemed to intensify the glued areas rather than being resisted by them.
Having dried the ink the stencils were replaced and another layer of glue applied in patches. Distress Glitters were then sprinkled over the top, allowed to settle/dry and then lightly brushed to remove any excess.
Finally I flicked Dylusions White Linen spray over the whole house to mimic snow, spritzing it with water in places to allow the splotches of ink to run slightly.
The windows were created using Tim Holtz's chalkboard technique (see his November Tag for a step by step). My version used embossed card rather than stamped card, but the effect is the same.
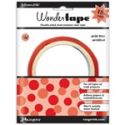
Now for the trimmings. Venise lace gave the roof a rather fancy border, much better than guttering! I used thin Wonder Tape to attach it as this gives a strong enough bond to hold it in position.
Rather that bother with a chimney I went for a seam binding bow with a little bakers twine added. The seam binding is coloured with Distress Stain and crinkles beautifully when dried with a heat gun.
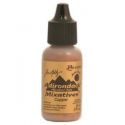
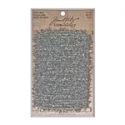
Various shapes were cut from the Sizzix Festive Greenery strip die. Most of these were covered in Distress Glitter, though the holly leaves were kraft glassine, inked up with Copper Mixative. The silver tinsel was given a patina, a technique learned from Creative Chemistry 102.
I hope you have got some ideas from this for your own festive projects from this and seen the potential for using these fabulous Distress Glitters. Remember, as a Friday Focus product they will  have that extra 15% discount applied for the coming week. They are well worth investing in and will last for ages.

Take care of yourselves,
Jenny